Do you want to know your computer’s processor, RAM, storage, graphics card, Windows version, or other hardware details, Windows 11 provides several built-in ways to check them.
The easiest option is Settings > System > About, which shows basic device specifications. For more detailed information, you can use Task Manager, System Information, DirectX Diagnostic Tool, or PowerShell.
In this guide i will explains how to check computer specs step by step and shows which method is best for different types of information.
The easiest way to check your computer specs on Windows 11 is:
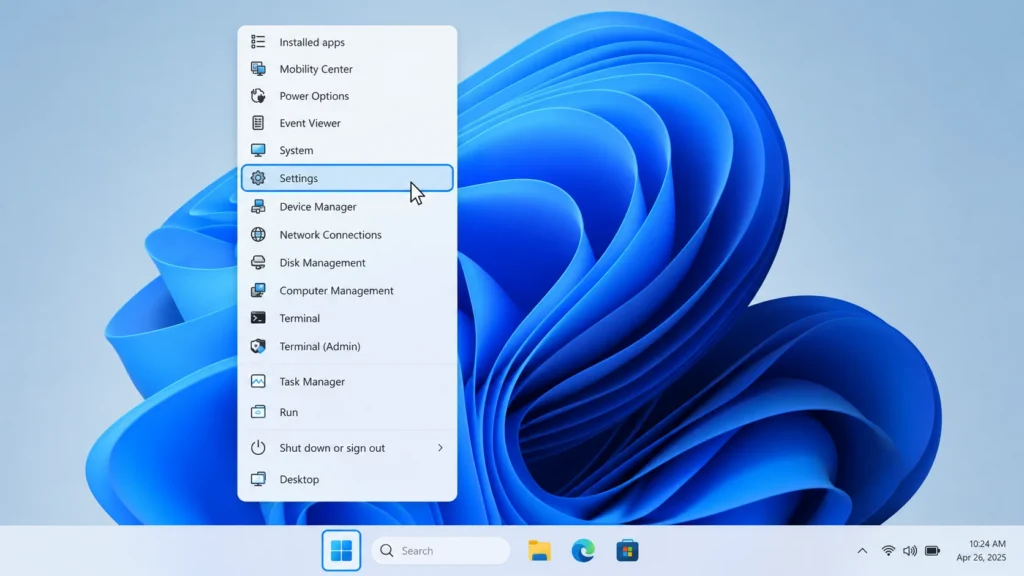
- Right-click the Start button.
- Select Settings.
- Go to System > About.
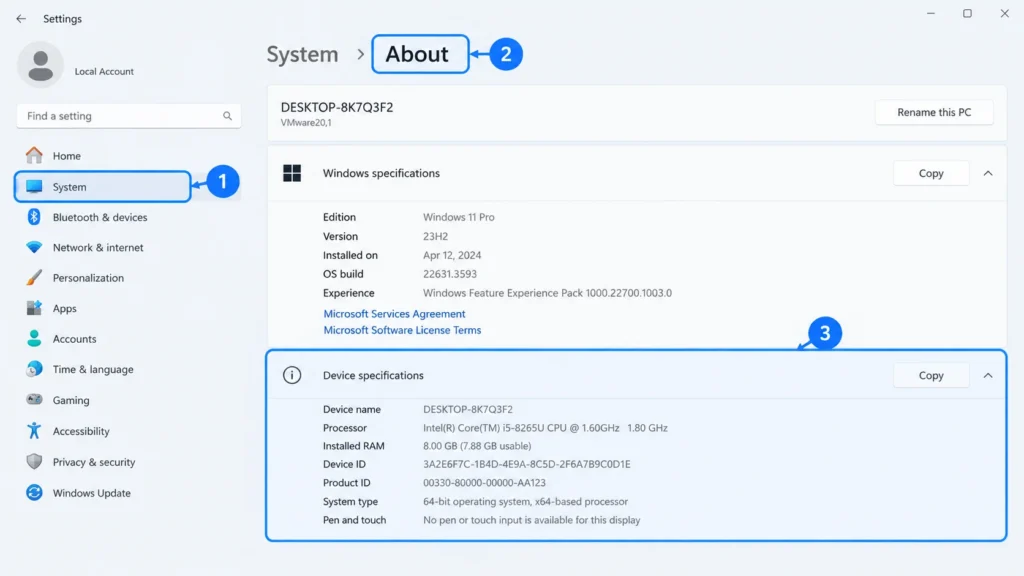
- Look under Device specifications.
You can see information such as your processor, installed RAM, device name, and system type. Windows specifications are also shown on the same page.
For graphics card information, Task Manager > Performance > GPU or DirectX Diagnostic Tool can provide more useful details.
What Computer Specs Can You Check?
Depending on the method you use, Windows can show information such as:
| Specification | What it tells you |
|---|---|
| Processor (CPU) | The main processor installed in your PC |
| RAM | The amount of system memory |
| GPU | Graphics processor used for display and graphics |
| Storage | Available and used disk space |
| Windows version | Windows edition and version |
| System type | 64-bit or other system architecture information |
| Device model | Computer manufacturer’s model information |
| BIOS information | Firmware details |
| DirectX version | DirectX components available on the system |
| CPU cores | Number of physical CPU cores |
| Logical processors | Threads reported by Windows |
You do not need a third-party application for most basic checks.
Method 1: Check Computer Specs Using Windows Settings
For most users, this is the best starting point. Microsoft recommends the System > About page for viewing basic device specifications such as the processor, installed RAM, system type, device name, and Windows version.
Step 1: Open Windows Settings
Right-click the Start button and select Settings.
You can also press:
Windows + I
Windows 11 uses Settings as the central location for managing system configuration.
Visual: Windows 11 Start menu context menu showing the Settings option.
Step 2: Open the About page
In Settings, select:
System → About
Scroll down if necessary until you see the Device specifications section.
Visual: Windows 11 Settings showing System > About with Device specifications visible.
Step 3: Find your processor and RAM
Under Device specifications, look for information such as:
- Processor
- Installed RAM
- Device ID
- Product ID
- System type
The exact information displayed can vary depending on the Windows version and device. Microsoft specifically identifies processor, RAM, and system type as key information available under Device specifications.
Step 4: Check your Windows version
Look for the Windows specifications section.
It can show information such as:
- Edition
- Version
- Installation date
- OS build
This is useful when you’re following a Windows troubleshooting guide that requires a specific version.
Step 5: Check available storage
To check storage, go to:
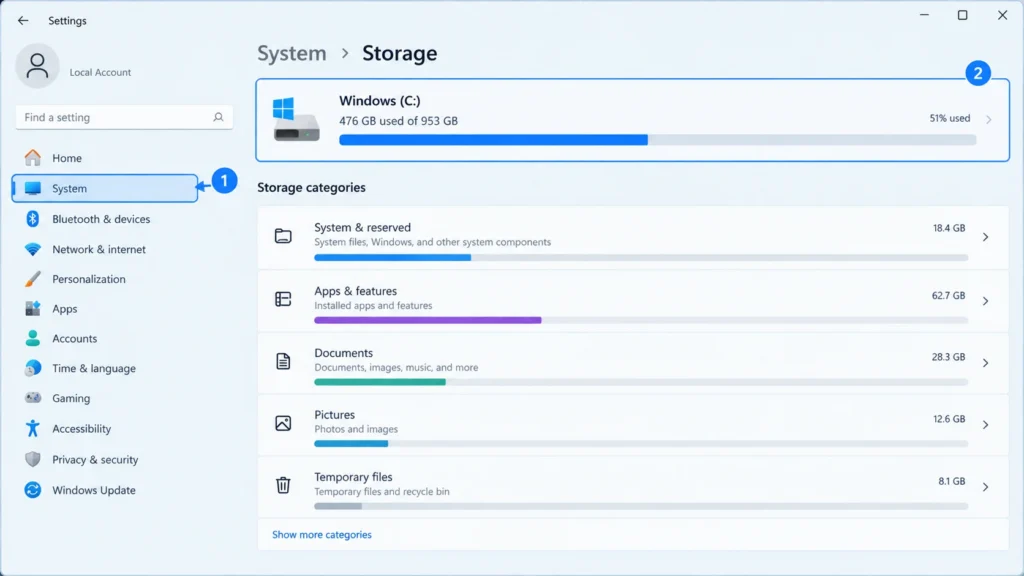
Settings → System → Storage
Windows displays storage usage for the device’s drives. If you have multiple drives, Windows also provides options for viewing storage used on other drives.
Method 2: Check CPU, RAM, Disk, and GPU Using Task Manager
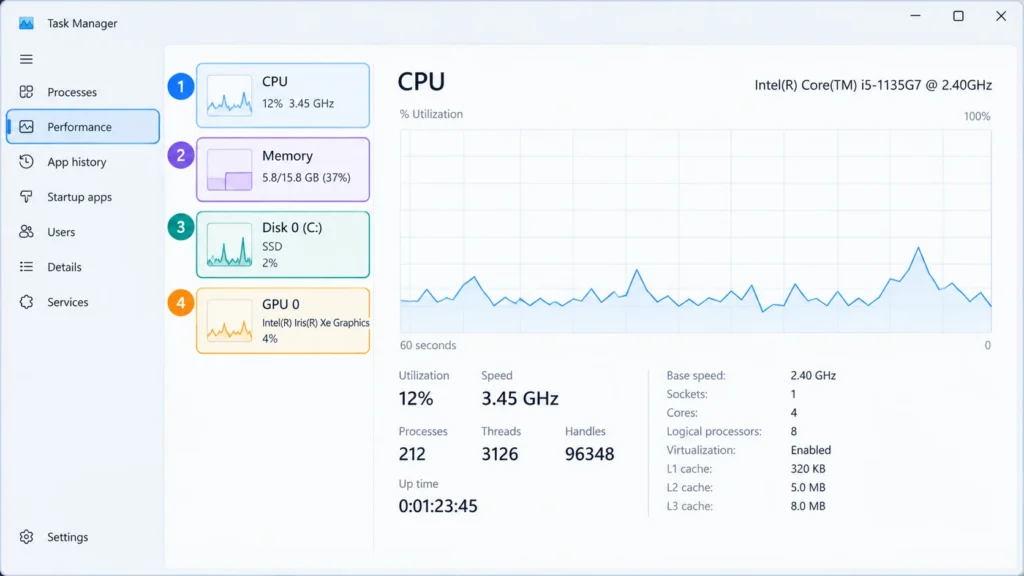
Task Manager provides a more detailed real-time view of important hardware resources, including CPU, memory, disk, network, and GPU information.
Step 1: Open Task Manager
Press:
Ctrl + Shift + Esc
Alternatively, right-click Start and select Task Manager.
Step 2: Select Performance
Select Performance from the navigation area.
You should see categories such as:
- CPU
- Memory
- Disk
- Wi-Fi or Ethernet
- GPU
The exact categories depend on the hardware installed in your computer.
Step 3: Check your CPU
Select CPU.
You can see information such as:
- Processor name
- CPU utilization
- Speed
- Cores
- Logical processors
- Cache information
- Uptime
Microsoft specifically documents Task Manager as a way to check the number of CPU cores and logical processors.
Step 4: Check RAM
Select Memory.
You can view information such as:
- Total installed memory
- Memory currently being used
- Available memory
- Memory speed
- Form factor, where reported
Step 5: Check your GPU
Select GPU.
Depending on your hardware and Windows configuration, you may see:
- GPU name
- GPU utilization
- Dedicated GPU memory
- Shared GPU memory
- Driver information
Recent Windows 11 updates have also expanded Task Manager’s visibility into NPU-related hardware on supported PCs, so some newer systems may show additional AI-accelerator information.
Visual: Windows 11 Task Manager Performance page showing CPU, Memory, Disk, and GPU sections.
Method 3: Check Detailed Specs Using System Information
Windows includes a built-in utility called System Information, also known as msinfo32.
Microsoft describes it as a comprehensive tool for viewing hardware, system components, and the software environment.
Step 1: Open Run
Press:
Windows + R
Step 2: Enter the System Information command
Type:
msinfo32Press Enter.
Windows will open the System Information window. Microsoft also documents msinfo32 as a way to launch System Information from Run or Windows Search.
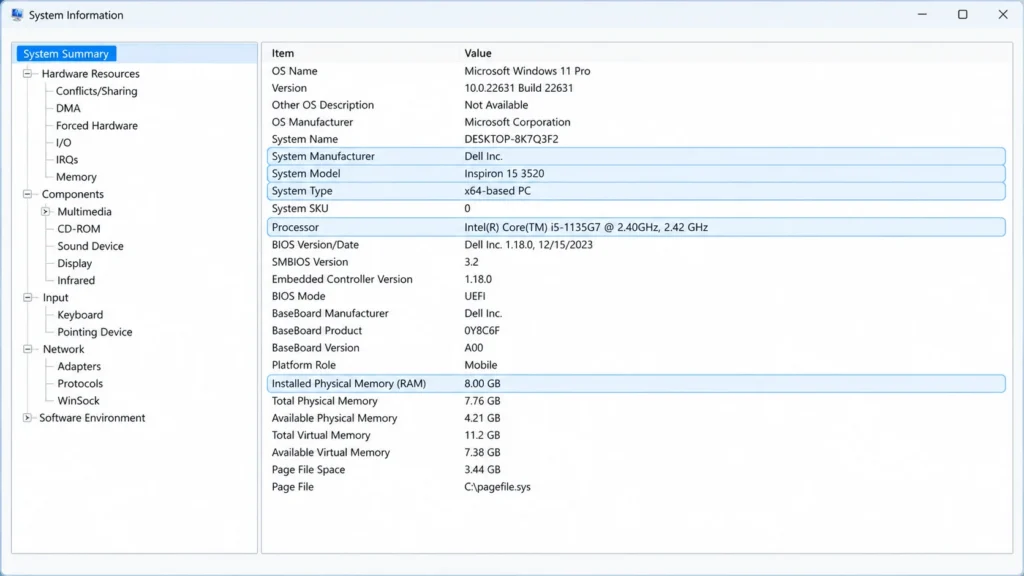
Step 3: Review System Summary
The System Summary section provides a broad overview of your computer.
Depending on your system, you may find information about:
- Operating system
- System manufacturer
- System model
- Processor
- BIOS
- Installed physical memory
- System type
- Windows version
Step 4: Explore hardware categories
Use the navigation tree to explore areas such as:
- Hardware Resources
- Components
- Software Environment
This method is particularly useful when you need more technical information for troubleshooting.
Visual: Windows 11 System Information window showing System Summary with processor, RAM, manufacturer, and system model fields.
Method 4: Check Graphics and DirectX Information With DxDiag
Windows includes the DirectX Diagnostic Tool, commonly called dxdiag.
Microsoft recommends DxDiag for viewing information about DirectX components and installed drivers.
Step 1: Search for DxDiag
Open Windows Search and type:
dxdiagSelect DxDiag from the results.
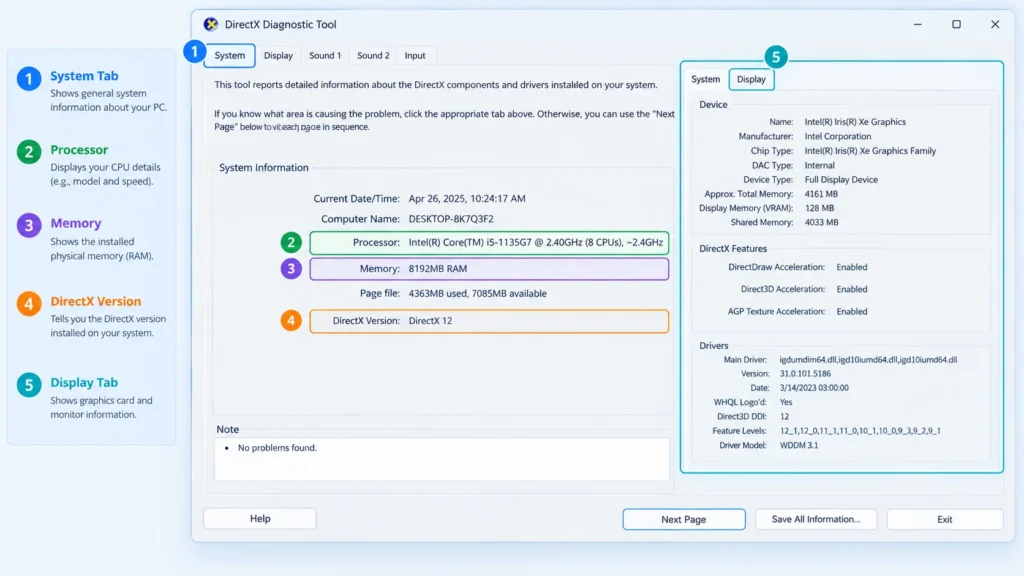
Step 2: Review the System tab
The System tab can show information such as:
- Operating system
- Processor
- Memory
- DirectX version
- System manufacturer
- System model
Step 3: Open the Display tab
Select the appropriate Display tab.
Depending on your system, you can find graphics-related information such as:
- GPU name
- Display memory
- Driver information
- Display details
The exact tabs and information can vary depending on the graphics hardware and Windows configuration.
Step 4: Save the information if needed
If technical support asks for your system information, DxDiag provides a Save All Information option that can create a report you can share.
Visual: DirectX Diagnostic Tool showing the System and Display tabs with important hardware information highlighted.
Method 5: Check Computer Specs Using PowerShell
PowerShell provides a convenient way to retrieve system and operating-system properties.
Microsoft’s Get-ComputerInfo cmdlet retrieves a consolidated set of system and operating-system properties.
Step 1: Open PowerShell
Search for PowerShell from the Windows Start menu.
Open it.
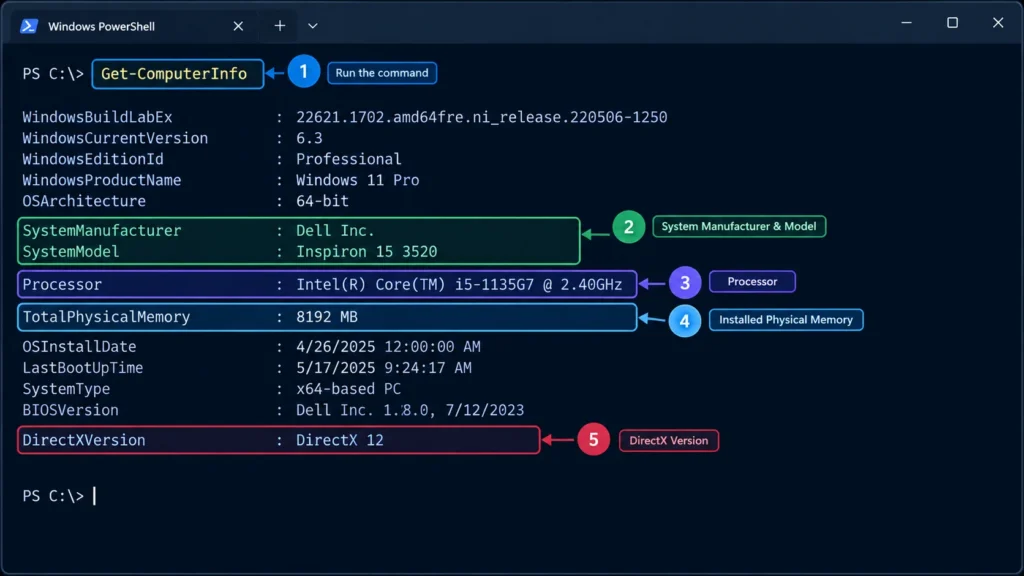
Step 2: Run Get-ComputerInfo
Enter:
Get-ComputerInfoPress Enter.
PowerShell will return a large amount of information about the system and operating system.
Step 3: Review the results
Depending on the information you need, look for properties related to:
- Windows version
- BIOS
- Operating system
- Computer name
- System information
This method is more technical than Windows Settings, so beginners will usually find Settings or Task Manager easier.
Visual: Windows PowerShell displaying the Get-ComputerInfo command and structured computer information.
Method 6: Check Storage and Hardware Through Windows Settings
If your main goal is to determine how much storage your computer has, Windows Settings is usually enough.
Step 1: Open Settings
Press:
Windows + I
Step 2: Open Storage
Go to:
System → Storage
Step 3: Review your storage
Windows displays storage usage and categories that help explain how disk space is being used.
If you have multiple drives, Windows provides additional storage options for viewing information about other drives.
Visual: Windows 11 Storage settings showing the main storage drive and storage categories.